 Adding new fonts to Blogger blogs is made possible with Google Font API. You don’t have to know any programming skills to do this; just get a simple HTML code from Google Web Fonts and add it to your Blogger Template. Then refer to the font in a CSS style. Here is an example:-
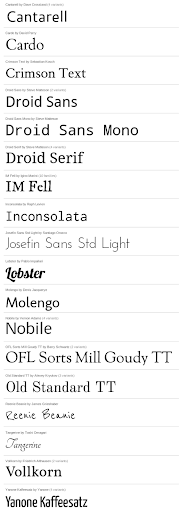
There are 18 new fonts which can be embedded into any web pages. Here is a screen shot of the list of fonts available in the Google Fonts Directory. Thanks to Browsershots for the shot.
So, follow these easy steps to embed those fonts to your blog.
1. Go to Google Fonts Directory.
2. Click on the font that you are interested.
3. Click on the “Get the code” tab.

4. Tick the checkboxes for the variant of the font that you want to use. Copy the code in the box.

5. Now log into Blogger > Design > Edit HTML. And search for </head> tag.
6. Paste code in the clipboard before the </head> tag.
7. So, whenever you want to use that font in your blog, just wrap your text with these tags. If you use other fonts other than Cantarell, just replace the red colored text below with the name of your font.
If you are good at editing CSS, then you can simply use the font in your CSS font stack like any other fonts.
font-family: ‘Font Name‘, arial, serif;
}
Browser compalitibity
The Google Font API is compatible with the following browsers:
* Google Chrome: version 4.249.4+
* Mozilla Firefox: version: 3.5+
* Apple Safari: version 3.1+
* Opera: version 10.5+
* Microsoft Internet Explorer: version 6+
For further informations about this Google Font API, visit their FAQ .